I sell adhesives, but I’m amazed at the sheer number of applications that I find. Just recently, I was searching for a hollow wall anchor for a wall-climbing setup that a group of volunteers is building at Christ the King School. When I called my trusted source for anchors and fasteners, he recommended an epoxied-in threaded rod method. Hmm. It’s easy, very solid, doesn’t require high-tech or costly equipment, and just as important… it’s low cost.
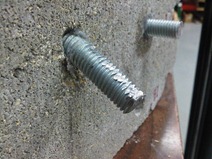
The idea is very simple: Drill a 5/8” hole that’s 1” deep into the masonry wall (avoid the grouted areas if possible). Make sure to remove all of the dust from your drilled hole using compressed air for best results. Fill the hole halfway with epoxy (we’d recommend Adhesive Systems MP 5405NS Maximum Performance 2 part epoxy), insert the threaded rod piece. In this case, we’re using 2 1/2” lengths of threaded rod, so that they’re flush with the 2×4 we’re attaching to the wall. Wiggle the threaded rod around in the epoxied hole to make sure that the epoxy fills up the threads, and evenly fills the hole. You’ll have to work fairly quickly, as this epoxy sets in only 3-5 minutes. Allow the epoxy to cure for about 30 minutes to ensure that it’s solid (though it only really takes 5-10 minutes).. and attach the panels to the wall. EASY!
 Still not convinced this is a good solution? We tested it!
We took a cinder block, and drilled a 5/8” x 1” deep hole. Once the glue had cured for an hour, we subjected it to the most destructive of testing methods. We hit the exposed threaded rod with a hammer! Our intent was to see how many hits it would take to break either the bolt, the cinder block or the adhesive. This was a lot of fun, except that nothing broke!
With at least 10 solid hits to the exposed threaded rod, all we managed to do was destroy the threads, and bend the 1/2” diameter threaded rod. The epoxy held firmly in place. Awesome stuff!
Want to learn more about possible applications for your project? Use our Contact Form to reach us! We’re here to help!


